Deploying QDV7 with Click Once |
  
|
Deploying QDV7 with Click Once |
|
Benefits
Click-Once for QDV7 is an installation process developed by Quotalys Ltd inspired by the Microsoft Click-Once technology. They work almost similarly (the user clicks on a web link), but Click-Once for QDV7 takes into account specific security issues and enables you to customize the product.
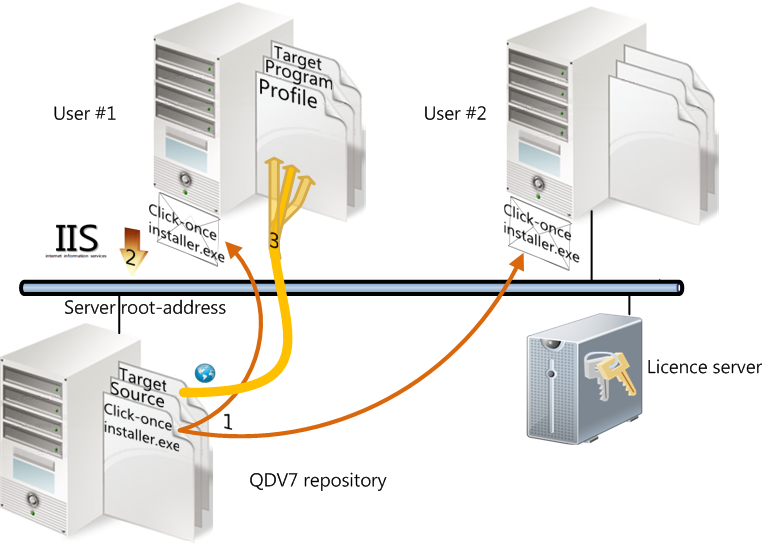
Click-Once enables the administrator to deploy the application to any computer, regardless of the end user rights; the user doesn’t have to be an administrator. In addition, the administrator can impose the configuration:
▪S/he can make the database paths 3 and 4 point out some central SQL Server databases (a later change will be enforced to all users on next publication)
▪S/he can require that the end users licenses be granted by a central license server
▪S/he can force some buttons to be in the users menu definitely, etc.
Requirements on User's Side
The end user runs Windows XP SP3 or a greater version.
.NET Framework 4.0 is installed, and also .NET Framework 2.0 (but this Framework is normally installed on all machines through Windows Updates).
First of all the installer checks for the presence of Framework 4.0. If it is not found, a message redirects the user to the download page of the Microsoft web site. As any framework installation, its installation requires administrative rights.
General Procedure
1.Install the QDV7 source on a computer which will serve as a repository to all client computers
2.Configure QDV7 as wished, setting database paths, licenses, buttons, etc; the source will be the master as described in the topic Configuration>Settings of new estimates
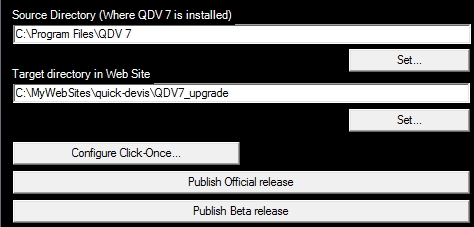
3.Start <QDV7 installation folder>/Publishing_Tool. To directly publish to a web site located on the same computer, you may need administrative rights; for this purpose, select Publishing_Tool.exe and right click "Run as administrator". In the dialog box, the Source directory is preset
4.Set the target directory, e.g. a Sharepoint space (click the Set button)
5.Click the Configure Click-Once button
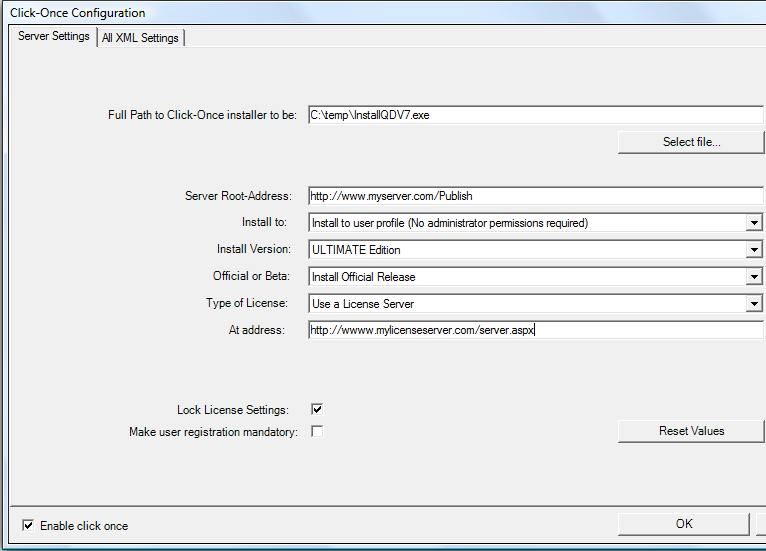
6.In the dialog box>Server Settings, specify where you want to find the installer and its name and the Server Root-Address (internet or intranet)
7.In the dialog box>All XML Settings, check the Enforce? box of each source setting that you want to keep
8.Click OK; the original dialog box shows again
9.Click either button Publish Official/Beta release; this transfers all the htm packets
10.Wait for the PUBLICATION TERMINATED message in the console; the installer has been created
11.Change the extension and e-mail the installer to all users. Alternative: downloading
12.Each user restores the extension and launches the installer; this sets up the complete configuration; the application is synchronized with the source.
|
|
Folder receiving the web pages and accessible from outside through IIS (UNC format) |
|
Buttons that triggers the creation of Click-Once installer.exe. "Official" for YOUR official release, "Beta" for release that YOU plan to validate. Distinct from similar Server setting |
NOTES
- The versions of subscribers to YOUR official version are NOT updated when you publish a beta, but versions of subscribers to YOUR beta version are if you publish an official version with a greater version number
- The Beta and Official versions are published into web site separate sub-folders: Official_Vx and Beta _Vx
Configuration
Server Settings:
|
Locates and names the lightweight installer to be created (UNC format) |
address of the target directory seen from the end users as an URL Profiles/Program files/Target FREE Edition/ENTERPRISE Edition/SMALL BUSINESS Edition/ULTIMATE Edition Refer to Controlling Upgrades Refer to the Installation topic License server: URL of license server or IP address + port (E.g. 18.25.56.89:8081) Corporate license: must be installed beforehand
If checked, the end user cannot change the license type and must use the license you provide Forces the user to enter name, company, telephone and email before use. Useful with a license server. |
By default, updates are read from the publisher’s web site and the end user can decide what they want to download. They have three deployment options:
▪Installation on a per-user basis: to user profile (it does not require administrator rights; no write to the Local_machine section of the registry)
▪Installations on a per-machine basis (they require administrator rights):
▪Deployment to Program/QDV 7
▪Deployment to any target directory
To uninstall a version installed on a per-user basis, launch <QDV7 installation folder>/uninstall.
The "All XML Settings ”tab lists all the source settings (refer to the topics Configuration, User Interface ...) with their values. Some settings are not displayed because they cannot be deployed, e.g. the default position of windows.
SWITCHING THE SERVER ADDRESS
The addressing is indirect. To shift to another publishing server:
1.Add a text file named MustSwitchServerAddress.inf in the installation folder of the old server. This file contains only the new URL
2.Include the file for publication (Applications tab)
3.Publish to create the lightweight installer
4.Distribute the lightweight installer; when the clients detects the file, they take the address it contains and update the local QDVUpdateAddress.inf file so that the computer points out to the new server.
You can use keywords such as <USER_NAME>, <INSTALL_PATH>, ....