Installation (Administrators only) |
  
|
Installation (Administrators only) |
|
To complete the installation of a bought version, a license code is required.
The license can be local (exclusively granted to one PC) or floating (the PC requests temporarily a token from a server) or, for more than 250 seats, be a corporate license (contact your dealer; to make sure this license is only used in your company, give us the data of a certificate installed on all computers in your company).
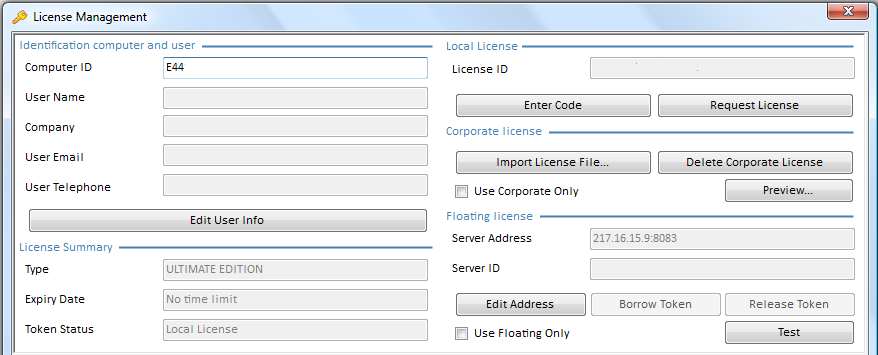
Local License
To specify a local license:
1.Select File>Help>License Management>Edit User Info; this auto-fills the Computer ID
2.Fill in the first section
3.Click Request license
4.Wait for the email in response
5.Press Enter Code
6.Enter the code given in the email in the License ID area.
NOTES
- If you already have a Quick Devis V6 code on your computer, provide this 12-digit QDV6 identifier and order the QDV7 code to IAES. IAES returns a QDV7 Enterprise Edition code for free. You can exchange either a computer-bound code or a Quick Devis V6 dongle. Then you can run on your computer either Quick Devis V6 or QDV7.
- The Server Address can be a OR of type <hostname>:8083.
Floating License
SERVER INSTALLATION
1.To get a License ID, indicate the Server ID to your retailer
2.Download and install the token server from http://www.iaes-software.com/downloads/QDV_TCPIP_Token_Server.exe
3.Open QDV7 in administrator mode
4.Select File>Help>License Management>Edit Address
5.Enter the Server Address: a URL starting with http or ending with server.aspx OR be of type <hostname>:<port number> or <IP address>:<port number>
6.Enter the Server ID and the License ID
7.Click Test; a message shows among others the Server ID and the License ID
8.If you want to inhibit a potential local license, check the box Use Floating Only; the Server ID area auto-fills.
NOTE
If you already have a license server for Quick Devis V6, just update it by the step #2 (don’t uninstall the old one).
The new server is compatible with QDV7 and with Quick Devis V6 so that you can share licenses for both applications.
For more details, refer to the built-in User Manual.
An administrator can force the address of the server on clients' side by two different means (the first one takes precedence):
1.Create a file QDVLicenseServerAddress.inf in the installation directory. It contains
- address: server address
- forceuseserver: YES/NO whether the user cannnot or can still use her/his local license when s/he owns it.
Examples
- for an LAN address:
address: 198.21.256.38:8080
forceuseserver: YES
- for a web address:
address: http://www.mydomain.com/myserverpath/server.aspx
forceuseserver: NO
NOTES
- YES: the license manager box "Use Floating Only" is forcibly checked
- When no server address is provided, the forceuseserver parameter is ignored (set to NO)
2.Create register keys in Hkey_Local_Machine\SOFTWARE\QDV\MAIN\
ForcedLicenseAddress |
Reg_SZ |
server address, e.g. 192.168.25.36:8080 |
ForceUseLicenseServer |
Reg_SZ |
YES |
You can also create those keys in the user section of the registry Hkey_Current_User\SOFTWARE\QDV\MAIN\. But the Hkey_Local_Machine takes precedence: when you have an address forced in Hkey_Local_Machine, the Hkey_Current_User address is ignored.
BORROWING A TOKEN
You can borrow, then release a license.
Do not confuse local licenses and borrowed licenses: even if you Use Floating Only, you can still borrow licenses.
1.Select File>Help>License Management>Borrow Token
2.When you have finished working, select File>Help>License Management>Release Token.
To install QDV7 in silent mode, run the setup as administrator with the switch /S:
C:\Temp>"C:\temp\Setup_QDV_7.exe" /S
or
C:\Temp>"C:\temp\Setup_QDV_7_Beta.exe" /S
To specify the ultimate or enterprise edition and the shortcuts, create the file setup_vars.ini containing the following statements (capitals are required):
[SetupValues]
%InstallationFolder%=C:\Program Files\QDV 7 New
%ShortcutMenu%=New QDV 7
%VersionLevel%=ULTIMATE EDITION
%ShortcutsFor%=USER
%AllowUpdaterService%=INSTALL
The omitted parameters get default values.
QDV7 editions (VersionLevel):
▪Free edition
▪Small business edition, that includes selling price calculation modes and forced prices
▪Enterprise edition (default value)
▪Ultimate edition, that includes in addition the Time-Frame fields and the Cash-Flow features.
Kinds of shortcuts:
▪Common, i.e. all users (default value)
▪User.
Updater service allowance:
▪DoNotInstall (default value): this removes the service if it is already installed (restricted to 64-bit versions)
▪Install.
The User Interface language cannot be set here because it belongs to the user profile. It may differ from one user to another. The default language is automatically the one of the system. When this one doesn’t exist, it is set to English and can be changed using the menu File>Options>Language.
If you have created an ini file, the command line is for example:
C:\Temp>"c:\temp\Setup_QDV_7.exe" /S:"C:\temp\setup_vars.ini"
Similarly, you can uninstall QDV7 in silent mode.
For development purposes, you may need two instances of QDV7 on the same computer: a regular one with the programming tools, another one in a virtual machine,
To benefit of the programming tools on the virtual machine as well, add a text file named QDVDevelopmentMachine.inf to the installation folder of QDV7 under the virtual machine.