General Settings |
  
|
General Settings |
|
To activate the planner, check the box File>Options>Calculations>Gantt diagram. Refer to Calculation options.
By default, the planner shows as a waterfall : the order of the rows is dictated by the group (or orphaned tasks) start dates, and the order adapts to changes in start dates.
To show the tasks in fixed rows, check the box File>Options>Display>Display the planner as a WBS rather than as a Waterfall diagram. This display mode is reminded in the Project Settings, Properties tab (Behaviour = WBS).
In this mode,
▪the row numbers show in the # column
▪to move a task, enter the desired rank in this column; if this compromises the integrity of the origin or target group, QDV7 moves the task to the closest rank to the target
▪to insert a task, first select the task or group which will appear above the new task. On the contrary, a group is always inserted as the very first row.
The diagram is rearranged if you toggle to Waterfall mode (and remains so if you return to WBS mode). A macro Update Gantt Diagram is included in the sample 1st_Demo_Estimata_WBS_BOQ_Planner; the launch button is in the Planner context tab and is requested thru the Automation/Additional Features menu.
To adjust the appearance of the diagram, click Planner>Settings, or Calendar to change only the calendar.
Project Settings
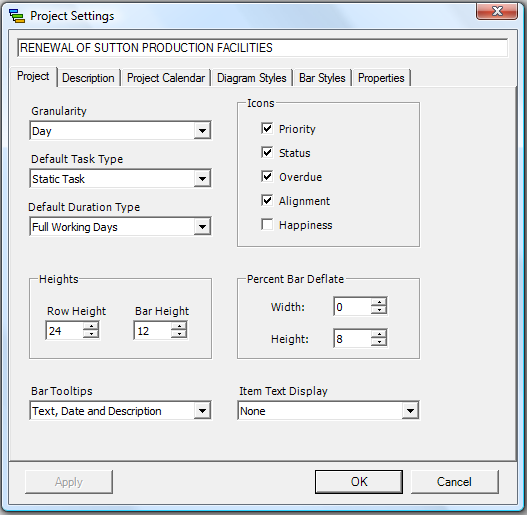
The granularity rules the date/time input fields.
Bar Tooltips: text shown when clicking the task bar. If you select
▪Text: the task/group name shows in its tooltip
▪Date: its initial and final dates and its duration show in its tooltip
▪Description: the description assigned to each task/group shows in its tooltip; by default, it is the name of the task/group
▪Dependencies: the task name it depends on shows
▪Custom: the description entered for the earliest task shows in all the tooltips.
Item Text Display: on the right of the bar, you can show the task name, the invoked resources and the resources availability percent (which determines the Happiness icon).
Individual settings can take over these settings.
In the Project Calendar tab, the default calendar can be customized just as another calendar (see below).
Calendars include weekly time-tables and exceptional days all the years round. They are variations, thru inheritance, of the default calendar defined in the Project Settings.
As the tasks are executed by different trades, the tasks can have different calendars.
The estimate's calendar can be changed any time; the Gantt diagram moves accordingly.
To set up a calendar:
1.Click New
2.Select a default calendar
3.Define the working days either as fully inherited or with exceptions; in the latter case, adjust the working hours for each selected day
4.Define the exceptions (shown with a bold typeface in the calendars): working days turned to day off or vice versa using the option Exception and the checkbox Working Day
5.Define the exceptional working hours using both options Exception and the text areas
6.Click OK; this saves the calendar.