How to Insert Rows From a Sheet |
  
|
How to Insert Rows From a Sheet |
|
To insert Excel row(s) into one Minute section:
1.Click Data>Import from Excel
2.Select an Excel file whose columns are already mapped by the Converter (name appended with {With mappings}); this opens the file in the Converter
3.Select all the rows to be inserted (even non adjacent by pressing Ctrl)
4.Drag the row(s) and drop it (them) to the desired section of Minutes (the destination is spotted with a horizontal guide below); the rows are inserted under one another in the order of the selection in step 3.
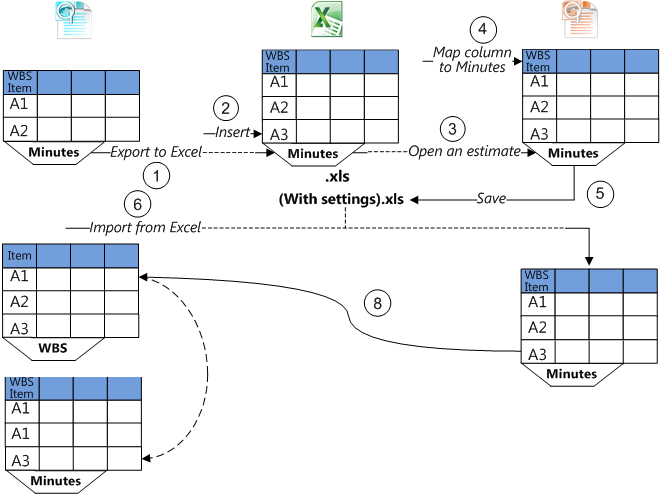
Dispatching to Various Sections
To insert at one time a bunch of rows into different sections of Minutes, use the native field WBS Item:
1.Insert this field into the Minutes view and click Data>Export to Excel
2.Open the xls file and insert desired row(s) at the end; enter the target section(s) through the WBS Item, and save
3.In QDV7 Converter, click Open an estimate and select the xls file
4.Select a template (generally the source estimate) and map the WBS Item column to the Minutes (see Conversion of a BoQ into an Estimate; in the dialog box, check the box View all columns for mapping); make sure the box Import field is checked in the left part
5.Save the file; its name gets the tag With settings
6.In QDV7, click Data>Import from Excel and select the file {With mappings}; this opens the file in QDV7 Converter
7.Select (all) the row(s) to be inserted (even non adjacent by pressing Ctrl)
8.Drag the row(s) and drop them anywhere to the condensed or expanded WBS (a hand-shaped pointer shows) (the destination is spotted with a horizontal guide below); as a result, each row is appended to the section corresponding to its WBS Item.
In this example, one row is inserted into the section A3: