Conversion of a BoQ into an Estimate |
  
|
Conversion of a BoQ into an Estimate |
|
Use Case
Refer to Bill of Quantities.
The created estimate inherits from a template all the settings:
▪Layout (frames)
▪Global variables
▪Version number
▪Security settings and permissions
▪Language, the settings in the Options menu (default folders).
It does NOT inherit the other options (VAT, rounding, colors) nor the behavior related to the management database.
Principle
QDV7 Converter executes automatically the phases #1, 4 and 5 of the process of converting a workbook into a qdv file:
Estimating template |
|
Rows to exclude |
||||
↓ |
↓ |
|||||
1 |
2 |
3 |
4 |
5 |
||
BoQ → |
OPEN |
MAP WBS & MINUTES COLUMNS |
SET EACH ROW's LEVEL |
CHECK ROWS |
BUILD |
→ Populated frame |
|
|
AUTO-LEVELING |
|
|||
The phases #2, 3 and 4 can be aided.
When a BoQ is open, the Build tab of QDV7 Converter features two flaps whose separating line can be moved:
▪A right flap hosts the working spreadsheet; the third row can be used to fill in extra columns using formulas (to fill merged cells, unlock the cells in Home>Format>Lock Cell, then enter the formula)
▪A left flap includes a table that lists out the mapped fields of the template, and a structural view below (visible after step #4) with tooltip <sheet name>/<row number>.
Each flap features its own focus. Both foci follow each other: to select a column, you can either click it on the right (or use the arrow keys ← and →), or click the related field on the left (or use the arrow keys ↑ and ↓).
Open
Click File>Open; in the dialog box, select Convert to an estimate.
Select the BoQ; QDV7 Converter opens the BoQ in the right flap flanked with a blue area consisting
▪on the right of column A, of seven columns with a heading 1 thru 7 (level in the WBS tree-view) and a column Minutes
▪above, of two blank rows topped by a combo box + formula bar.
It is possible to enter new values either in the Converter, or in Excel, by clicking Edit Outside With Microsoft Excel; both versions can be opened simultaneously; the changes made in Excel pass on to Converter when the xls file is closed.
To insert a new row, select the row that will follow/precede it, click Home>Edit>Insert and select Insert Rows Before/After.
To insert a new column, select the column that will follow it, click Home>Edit>Insert and select Insert Columns.
To enlarge/narrow the columns, click Home>Edit>Format>Column width.
To rearrange the sheets in the workbook or to hide some of them, click Build>Select Sheets.
Tool: bar Build

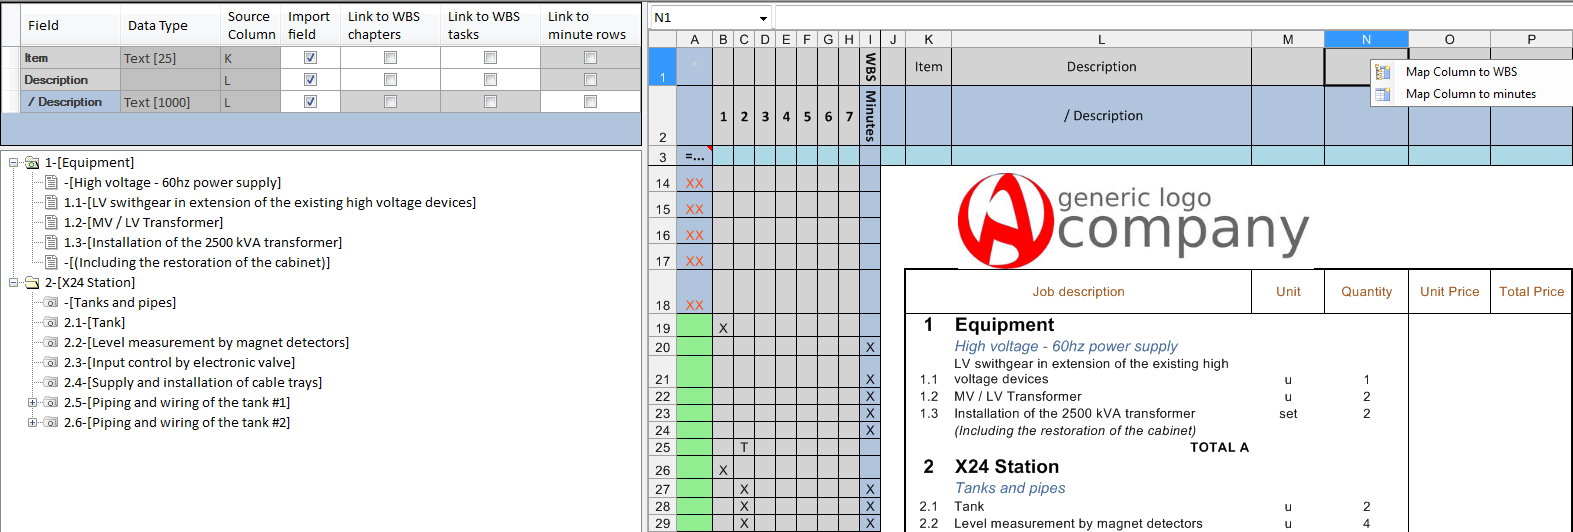
Map WBS & Minutes Columns
Click Build>Select Template and select a ".qdv" estimate (to enlarge the choice, in the dialog box, check Select my estimate). To populate the list, refer to Settings of New Estimates.
To match the BoQ columns with the template fields:
1.Select the sheet of interest
2.Right-click in a cell J1, K1 ... and select Map Column to WBS OR right-click in a cell J2, K2 ... and select Map Column to minutes (alternative ways: double-click in row #1 or 2 and menu Mapping>Map Column to WBS/Minutes); a dialog box Select column shows
3.Select a field (all the free columns inserted in the template are eligible); for more native fields, check the box View all columns for mapping
4.If the need arises, check the box Link to BOQ rows and, for the WBS fields, Link to BOQ chapters (below the field list); this will be used to export the estimate values back to this BoQ column (blue cell in QDV7)
5.Click OK; the field name displays as a heading; in the left flap, depending on the step #4, the box Link to BOQ rows and, for the WBS fields, Link to BOQ chapters are checked or not (the boxes are editable; with two separate boxes for WBS, you can keep formulas in a column for chapters, and still link Tasks cells)
6.Repeat with other columns; it is possible to map new columns and treat several sheets in different manners.
The left flap displays by default only the columns Field and Data type (with the maximum char counts). To display Source column, Import field and Links to BOQ, drag the vertical separating line.
To delete a mapping, in step #3, select "Cancel mapping of this column".
![]() To speed up the step #3, preselect the fields in the Fields Managers: right-click their row and select Show by default in the converter; their get tagged by a comment (visible in the WBS Properties).
To speed up the step #3, preselect the fields in the Fields Managers: right-click their row and select Show by default in the converter; their get tagged by a comment (visible in the WBS Properties).
To aid mapping:
1.Select a heading row in the BoQ (row 17 in the example)
2.Click Map>Identify according Selected Row
3.Confirm in the message; QDV7 Converter then forcefully maps the columns whose BoQ label matches a field name; besides, the row is excluded (mark X: see further).
![]() In aided mapping, do NOT use any abbreviation in the heading row, as the matching must be total.
In aided mapping, do NOT use any abbreviation in the heading row, as the matching must be total.
The Description field is mandatory at the WBS level.
The boolean "WBS by total" field marks a Total Mode. Check the 'Import field' box.
The boolean "Option - Move to bottom" field is useful when the "Is Option" field is mapped, wherever it equals 1. It leads to checking the "Move to bottom" box. (Refer to Bottom Area.) When a branch is an Option, all its children are forced to become optional and follow its "Move to bottom" behavior.
The Minutes fields /Percent and /Data is wrong were used for BoQ in older versions. Check the "Link to BoQ" box.
To delete all the mapping in a sheet, click Map>Clear Mapping.
To use a file QDV converter settings, see further.
To deploy the mappings and formulas to other sheets, click Build>Copy to Sheets.
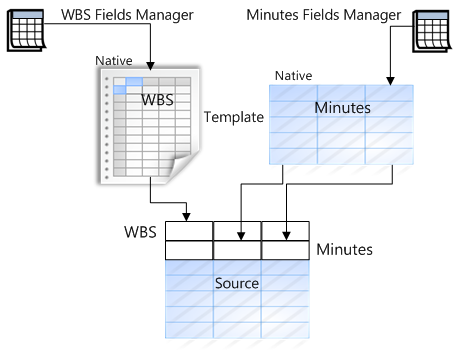
The WBS is built from some BoQ elements, but the bidder defines the structure at his/her own discretion, using an outline.
To enroll a row to WBS, enter X in the column corresponding to the level (1 thru 7); alternative: double-click.
To inform QDV7 Converter that a row is a total or a sub-total, enter T in the column corresponding to the level (1 thru 7). See further.
To transform a row into a minute, enter X in the blue column.
To transform a row into a row in the Database of the Estimate, enter D in the blue column. In addition, map one column to Reference to article (before, check the box "View all columns"); the related cell must not been empty. If the template has a database of estimate of its own, no row can be added into it.
NOTES
- One X or one T is allowed in a row across the columns B to H; X and T are exclusive of each other.
- Another X is allowed in the column I; it will be used to insert a first Minute with the same description as the WBS (if it is mapped to WBS AND Minutes); QDV7 Converter assigns the values in the other columns (quantity, ...) according to the mapping; if the column is mapped as Quantity for WBS and Quantity for Minutes, both will get the quantity.
- If mapping and leveling are conflicting, the value is not assigned; the following table summarizes the various cases:
|
|
WBS |
Field |
|
Field |
|
|
Min |
|
Field |
Field |
First case |
X |
|
to WBS |
to none |
to WBS |
Second case |
|
X |
to none |
to Minutes |
to Minutes |
Third case |
X |
X |
to WBS |
to Minutes |
to both* |
The second case applies to most free fields.
* If both mappings are to Quantity, the quantity is assigned to the Minute, while WBS Quantity value is set to 1.
- The following structures are forbidden; on the left, the row is not a terminal element as it is a parent row; on the right, there is a hole in the structure. A message indicates that QDV7 Converter invalidates them.
|
|
|
WBS |
|
|
|
WBS |
|
level |
n |
n+1 |
Min |
|
n |
n+1 |
Min |
|
row |
X |
|
X |
|
X |
|
|
|
|
|
X |
|
|
|
|
X |
|
QDV7 Converter can infer the row level from rules. If they are impossible to enforce, they are ignored. The field Item must be mapped at the WBS level.
The structure results from two basic rules:
▪The item numbers are based on the rule Node (n+1) = node (n) + tag; hence the level 1 features the shortest item numbers
▪A row without an item number is considered as the child of the preceding row; that is why the comments must be excluded (from the structural view).
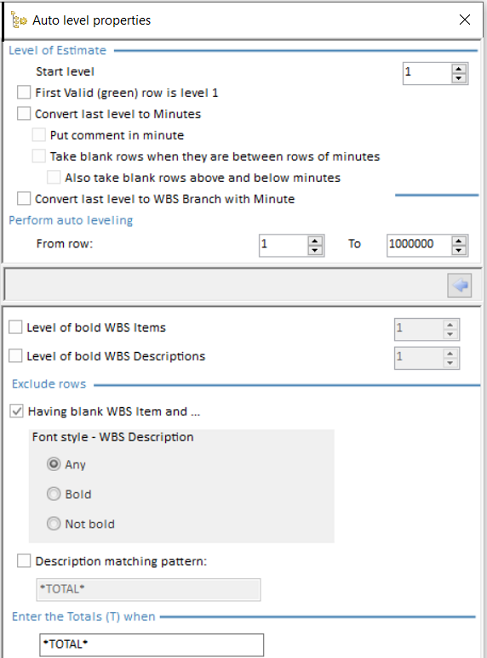
After mapping at least the columns WBS Description and Item:
1.Click Auto Levels
2.Answer Yes to the message; this fills the column A as described further
3.Fill in the dialog box.
The rules defined by the user on a sheet basis include the start level, forceful leveling and downgrading to Minutes:
|
|
Level for one-char item such as A or 1 (mandatory, 1 by default); this level is applied to first valid row, which is used as baseline. The box value is ignored if the first valid row has a WBS Item |
|
The rows with the highest WBS Level are downgraded to Minutes (condition: this field must be mapped) Includes item-less rows in the Minutes view
Marks also blank rows as (interpolated) Minutes depending on their position in the BoQ |
|
The rows without items or the longest items are downgraded to terminal element (lowest task i.e. leaf) |
|
Range of rows to process |
|
Level of rows whose item shows with boldface type Level of rows whose description shows with boldface type |
|
|
|
Criteria for automatic exclusion from the structural view (comments, titles)
|
|
Wildcard char ? and * are allowed; case-insensitive. See paragraph TOTALS. Overridden by next setting |
|
|
|
When this string of chars (case-insensitive) is detected in the Description column, a T writes at the same level as the row whose it sums the components (parent row). See paragraph TOTALS. Overrides the preceding setting |
Click OK. This enforces the rules, as far as possible. If the exclusion rules have allowed unwanted rows, click Mapping>Exclude Row; the first cell gets a red cross.
NOTE If there are several numbering patterns, several structures are created in parallel.
Description matching pattern:
▪Unchecked box: no row with correct formats is excluded a priori from the structural view
▪Checked box: all the row descriptions are tested against a string; this excludes the matches from the structural view; they get neither X, not T (unless it is detected as a total by the setting Totals).
Totals: the result is as follows:
level |
n |
n+1 |
parent row |
X |
|
|
|
X |
|
|
|
|
|
X |
matching row |
T |
|
The T row wordings are harmonized to Total chapter:<item number> and aligned on the left; QDV7 Converter creates the related formulas.
If a comment precedes directly a total row, it is recommended to exclude the comment row.
Check Rows
QDV7 Converter checks the formats only at the intersection of rows with mapped columns. Note that a text is allowed for a quantity.
To check the conformance of imported data against the field format, carry out the following operations, at least step #3:
1.Select in column A a cell of rows to exclude from the estimate, and click Mapping>Exclude Row; the cell gets a red cross
2.To cancel the step #1, select in column A the cell of rows with a red cross and click Mapping>Include Row; the cell empties; to restore the green color, click Build>Check only
3.Click Build>Check Only; answer Yes to allow the conversion in spite of errors; then a validation report displays and the column A turns green in the valid rows.
|
Description |
Shown in estimate? |
|
Error in the row, usually due to merged cells; the embedded comment indicates the error type and the column where the error is |
No |
XX |
Row ignored (the content formats are different in the template, or it is a WordArt text). To keep comment rows, a missing item does NOT result in ignorance, but a missing Description does |
No |
X |
Excluded row (thru the menu) for other reasons; this exempts the row from check, but excludes it from the estimate. This can also be used after auto-leveling |
No |
Valid row |
Yes |
Whenever the column mapping is modified, the results of the check are deleted.
Note: the WBS quantity values are not tested; hence a text does not make its row ignored.
STRUCTURAL VIEW
QDV7 construes any row with an X at the intersection with a column 1 ...7 as a node. The nodes feature a pictogram and the mark <Item>–[<Description>].
|
Expanded node |
Collapsed node |
||
|
Unselected |
Selected |
Unselected |
Selected |
WBS chapter |
|
|
|
|
WBS leaf |
o is overlaid on the pictogram |
|||
Minute |
|
|
– |
– |
To update the structural view after editing the gray and blue table, click again Check Only.
Build
To prevent some mapped columns from being inserted, uncheck the box Import field on the left. In addition, this exempts these columns from the check.
Applicability: this is NOT allowed for:
▪Item, Description (WBS and Minutes): although possible, this forbids checking rows
▪Cost per unit (WBS) as it is a read-only field
▪etc
To create the estimate in QDV7:
1.Click Build>Check and Build
2.Select the folder
3.Enter an estimate name
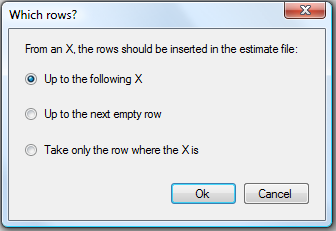
4.In the dialog box, indicate to QDV7 Converter how rows without X in the WBS part must be treated; in any case, it inserts an interpolated row between node rows (see Kinds of Row).
|
|
The XX-row place is retained and there is an interpolated row between all the rows (even nodeless) |
|
The XX-row place is removed (except ahead) and the nodeless rows (without X) are attached to the preceding node (no interpolated row) |
|
Compact estimate: comment rows and nodeless rows are removed; T totals are retained |
Select also which the fonts and colors are inherited: from the converter (i.e. the Excel file) or from the qdv template.
If a box Link to BOQ has been checked, the resulting estimate owns a BoQ tab, where the related columns feature a blue background in the rows with an X and of the first level (Link to BoQ chapters) or of the WBS branch level (Link to BoQ rows). Refresh the estimate. If the template has a special field "Has reference in the BOQ" (see Bill of Quantities (optional)), the Minutes of the built estimate with at least one linked column, feature a value 1 in the column "Has reference in the BOQ".
To save the workbook and column mapping, click File>Save. This way the original workbook is retained; to populate it with the estimate's data, select, in the created estimate, the tab BoQ and click Data>Excel>Export to Microsoft Excel.
To save the current file's settings, click Build>Save Settings and choose a name.
The settings file is a text file, whose extension is qdvconvert; it includes in addition to the potential formulas:
1.After the template selection, the full path to the template
2.After the mapping, in addition, all the column mapping, including the check status of the boxes Import field and Link to BOQ chapters/rows)
3.If the Autolevel is used, the last used Auto Levels properties
4.After exclusion, in addition, the line number of the excluded rows.
To load settings:
1.Click Build>Load Settings and select a ".qdvconvert" file
2.Click Build>Mapping>Load Mapping and reselect the ".qdvconvert" file; if the workbook features several sheets requiring specific treatments, make the selection in the relevant dialog boxes; the column headings and the left flap populate accordingly
3.If the workbook features several sheets with some unchecked ones, to remediate this, click Build>Mapping>Copy to Sheets.
NOTE
The name atop and in the taskbar gets longer as you carry out the operations:
- After opening: -[<Sheet file path and name>.<extension> (Template:)] where the path is C:\Users\<user name>\AppData\Local\Temp\QDVTempFilesMain
- After template selection: -[<Sheet file path and name>.<extension> (Template: <template name>.qdv)]
- After saving, the name by default is: -[<Sheet file path and name>.<extension> (Template: <template name>.qdv) [With mappings]]