Conversion of a Workbook into an Article Database |
  
|
Conversion of a Workbook into an Article Database |
|
A database template passes on its standard fields and inserted fields to the database to create.
QDV7 Converter executes automatically the phases #1, 3 and 4 of the process converting a spreadsheet into a qdb file:
Database Template |
Rows to exclude |
||||
↓ |
↓ |
||||
1 |
2 |
3 |
4 |
||
Sheet → |
OPEN |
MAP COLUMNS |
CHECK ROWS |
BUILD |
→ Populated frame |
The phase #2 is manual or aided.
QDV7 Converter features two flaps whose separating line can be moved:
▪A right flap with the working spreadsheet; the second row can be used to fill in extra columns using formulas
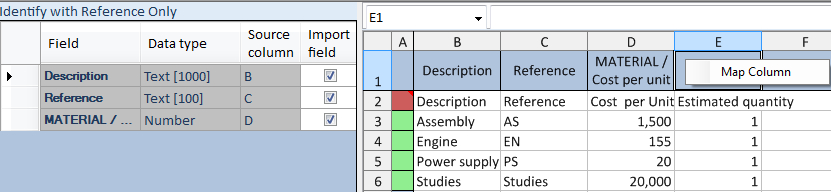
▪A left flap with a table that lists out the mapped fields of the template, and the Tree key (optional index)
Each flap features its own focus. Both foci follow each other: to select a column, you can either click it on the right (or use the arrow keys ← and →), or click the related field on the left (or use the arrow keys ↑and ↓).
QDV7 comes with a example of sheet to convert. Click File>Samples>frame for articles; this opens the file and replaces the step #1.
Open
Click File>Open; in the dialog box, select Convert to a physical database of articles.
Select the spreadsheet file; QDV7 Converter opens the file in the right flap; the file is topped by a blank row.
It is possible to enter new values either in the Converter, or in Excel by clicking Edit Outside With Microsoft Excel; both versions can be opened simultaneously; the changes made in Excel pass on to Converter when the xls file is closed.
To insert a new row, select the row that will follow/precede it, click Home>Edit>Insert and select Insert Rows Before/After.
To insert a new column, select the column that will follow it, click Home>Edit>Insert and select Insert Columns.
To enlarge/narrow the columns, click Home>Edit>Format>Column width.
To rearrange the sheets in the workbook or to hide some of them, click Build>Select Sheets.
Tool: bar Build
Map Columns
Click Build>Select Template and select a qdb database.
To match the columns and the template fields:
1.Right-click in a column and select Map Column (alternative ways: double-click and menu Mapping>Map Column); the 'Select column' dialog box shows
2.Select a field (the free columns inserted in the template are eligible; for more native fields, check the 'View all columns for mapping' box) and click OK; its name shows in the heading and in the left flap
3.Repeat with other columns; it is possible to map new columns and treat several sheets in different manners
![]() To speed up the step #3, preselect the fields in the Fields Manager: right-click their row and select Show by default in the converter.
To speed up the step #3, preselect the fields in the Fields Manager: right-click their row and select Show by default in the converter.
The left flap shows by default only the columns Field and Data type (with the maximum char counts). To show Source column and Import field, drag the vertical separating line.
To delete a mapping, on the step #2 select the first item: 'Cancel mapping of this column'.
To delete all the mapping in a sheet, click Map>Clear Mapping.
To use a file QDV converter settings, see further.
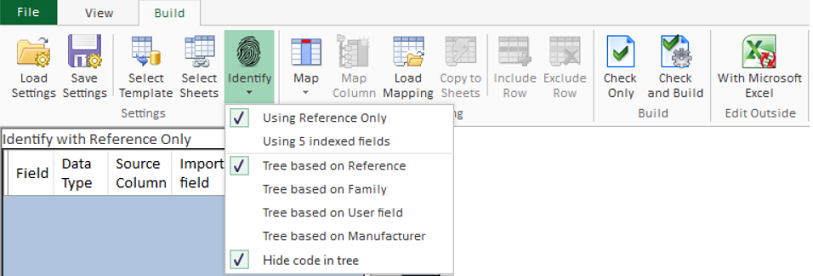
The Reference field is indispensable; some others too according to the database expected behavior (refer to How to Change a Database Behavior). Click Identify and change option if needed; the chosen option is repeated in the left flap.
The code and description fields are described in How to Index a Table (Tree Structure), marks #3a and 3b. The key field (mark #2) can be preselected in the second half of the Settings>Identify menu.
These fields can be identified in a separate sheet.
Check Rows
QDV7 Converter checks the formats only at the intersection of rows with mapped columns. Note that a text is allowed for a quantity.
To check the conformance of imported data against the field format, carry out the following operations, at least step #3:
1.Select in column A a cell of rows to exclude from the estimate, and click Mapping>Exclude Row; the cell gets a red cross
2.To cancel the step #1, select in column A the cell of rows with a red cross and click Mapping>Include Row; the cell empties; to restore the green color, click Build>Check only
3.Click Build>Check Only; answer Yes to allow the conversion in spite of errors; then a validation report displays and the column A turns green in the valid rows.
Legend of column A:
|
Description |
Shown in database? |
|
Error in the row, usually due to duplicates of the primary key; the embedded comment indicates the error type and the column where the error is |
No |
XX |
Row ignored: the content formats are different in the template, or it is a WordArt text, or some cells are merged |
No |
X |
Excluded row (thru the menu) for other reasons; this exempts the row from the check, but excludes it from the database |
No |
Valid row |
Yes |
Whenever the column mapping is modified, the results of the check are deleted.
Build
To prevent some mapped columns from being inserted, uncheck the box Import field on the left. In addition, this exempts these columns from the check.
To create the database in QDV7:
1.Click Build>Check and Build; this opens the database selector (refer to How to Create & Manage the Databases)
2.Select a directory in the drop-down list
3.To create a new database, click New and enter a database name; it shows in the directory
4.Select the database and click Open; add/update/delete articles or replace the database, if it was existing.
NOTE The individual databases (views) of remote databases cannot be selected, because only complete SQL Server databases can be updated or replaced.
To save the workbook and column mapping, click File>Save.
Additional Procedure to Build a Database with an Index
The indexing is described in How to Index a Table (Tree Structure). To avoid showing the code in the treeview, check the 'Hide the code in tree' box either in the ribbon (Identify menu), or in the dialog box.
The identification basis is inherited from the template (Database>Tree View menu):
![]()
Two special columns are required:
▪the column that contains the roots of the key column; it must be mapped as Tree code
▪the column that contains the descriptors; it must be mapped as Tree description.
These columns can be located in a sheet apart from the other fields.
One-level example:
Reference |
<Key field> |
Tree code |
Tree description |
|
Axyz |
A |
Range A |
|
Buvw |
B |
Range B |
|
Auvw |
A |
Range A |
Two stages are required (1-2-3 and 4-5-6):
1.In addition, map these special columns as Tree code and Tree description
2.To specify the index key, check the desired item Build>Identify>Tree based on ...
3.Check and build the new database; this creates the index, but not the articles
4.Delete the mapping of the two special columns ('Cancel mapping of this column')
5.If several levels exist in the tree-view, exclude the rows that do not describe articles
6.Rebuild and select Open, then Update; this populates the database.
If the field Tree contract code is mapped, it substitutes for the Tree code field (which is still required). This results in the index as: ‘Tree contract code’-[‘Tree description’].
The "The given key was absent from dictionary" message means that a value of the key is not defined.
To save the current file's settings, click Build>Save Settings and choose a name.
The settings file is a text file, whose extension is qdvconvert; it includes, in addition to the potential formulas:
1.After the template selection, the full path to the template
2.After the mapping, in addition, all the column mapping, including the check status of the 'Import field' box, and also the status of the 'Hide code in tree' flag
3.After exclusion, in addition, the line number of the excluded rows.
To load settings:
1.Click Build>Load Settings and select a ".qdvconvert" file
2.Click Build>Mapping>Load Mapping and reselect the ".qdvconvert" file; if the workbook features several sheets requiring specific treatments, make the selection in the relevant dialog boxes; the column headings and the left flap populate accordingly
3.If the workbook features several sheets with some unchecked ones, to remediate this, click Build>Mapping>Copy to Sheets.
NOTE
The name atop and in the taskbar gets longer as you carry out the operations:
- After opening: -[<Sheet file path and name>.<extension> (Template:)] where the path is C:\Users\<user name>\AppData\Local\Temp\QDVTempFilesMain
- After template selection: -[<Sheet file path and name>.<extension> (Template: <template name>.qdb)]
- After saving, the name by default is: -[<Sheet file path and name>.<extension> (Template: <template name>.qdb) [With mappings]]