Macros |
  
|
Macros |
|
Two kinds of macros are used in QDV7:
▪the QDV macros written in C# or Visual Basic .NET
▪the Excel macros written in VBA; they do not write to the estimate, but to exported Excel files; the extension xlsm is not supported.
The macros can be invoked by clicking macro buttons or on particular events.
It is subject to a security setting (Macros). When disabled, you can still execute predefined macros in the group Macros buttons.
If too many buttons are required, you can call a macro which indexes other macros, for example Call_All_Macros_And_Requests in Multi_Language_Sample_With_Documents.qdv. Refer also to Code Samples.
Five examples of macros show in the Multi-languages sample. "Sample write to overhead workbook", written in VB .NET, enables you to write to Overhead user sheets.
Two are assigned to macro buttons 2 (QDV macro) and 3 (Excel macro).
QDV Macros
QDV API generates pre-compiled programs called Macros. These programs are compiled at run-time on the target computer:
0 |
|
1 |
2 |
|
3 |
MS Visual Studio |
|
QDV Program Editor |
|
QDV7 Run-time |
|
Edition |
→ |
Post-edition |
Pre-compilation |
→ |
Compilation |
|
Import __↑ |
|
|
|
|
To create/edit a QDV macro, click Automation>Macros>Macros>Open QDV macro; this opens a dialog box.
![]() Beware of long very names or codes of macros.
Beware of long very names or codes of macros.
To create a macro, click the Create button; this opens the QDV Program Editor; enter the code and click Build>Compile and Save; this adds the macro to the list. For details on the API, refer to the topic on the macro API.
To edit the macro, click either button Edit or Edit under Visual Studio (this requires the version 2010 or later, regardless of the UI language; the Express editions are not supported). It is helpful to enter the object name, then a dot and tap into the in-line picker the properties/methods and events. Breakpoints are supported.
To add a reference to any assembly in the .NET Framework or to any .NET assembly in the QDV7 installation folder, click Build>References and check the assembly. To reference your own assemblies, make sure they are compiled using the ‘Any CPU’ option under Visual Studio and place them in the installation folder; you can deploy them automatically to all of your client computers using the publishing tool (located in the installation folder).
To export a macro:
▪without programmer license, in the dialog box, click the button Export
▪with programmer license, it is also possible from the editor: select the Projects pane >Projects, select the macro and right click Save Macro As.
To import a macro, click the Import button and select the macro among the files with extension qdvmacro; as there is no compilation, a programmer license is not required.
Procedure (the step numbers are also the numbers in the table above):
1.To post-edit a QDV macro, select it and click the Edit button (alternative: double click); this opens the QDV Program Editor
2.To pre-compile the macro, click Build>Compile and Save
3.To run the macro using the Macro menu, click Run Macro, select the macro and click the Run button.
Alternative with Visual Studio: press Edit under Visual Studio and use the QDV menu.
Refresh_Current_View() is used inside a loop to update the minutes right away, in particular before acknowledging the message QDV_Editor stating the number of writes.
Macros in the Multi-languages sample:
▪Access_Active_Directory: returns the name of administrators
▪Browse WBS and Minutes: exports the Minutes' Descriptions and Units to a text file, with indentation
▪Build_Entire_Estimate_From_Excel_File: converts an Excel file into a QDV7 estimate
▪Call_All_Macros_And_Requests: indexes all the macros and requests in the estimate
▪Generate Technical Document: allows estimate's Publishing in pdf (fourth macro button); you must allow Word macros
▪Insert some rows from cursor: inserts a set count of rows below the selected minute; the Description, Quantity and Material/Cost per unit have set values
▪Just Export Current Minute: exports to an Excel file the whole section of Minutes containing the selected row
▪Populate Excel file with Report: exports the WBS report to any Excel file with a sheet named Report_Profile (source file)
▪Populate_Foreign_Excel_Workbook: pastes values and format to a workbook whose sheet names match names in the overhead workbook (the sample may be read only)
▪Sample Extract Workbooks: generates Nomenclatures (the workforce-only Minutes are listed at the beginning), or test WBS report with various profiles
▪Sample to browse WBS Headings: extracts IDs
▪Sample to simply read some cells from any QDV workbook: extracts the cost center totals from the Sheet of Sales
▪Sample which exports an article database: exports <installation folder>\Samples\databases_of_articles\Sample_Article_DB.qdb to Excel
▪Sample write to Overhead Workbook: modifies the color of a rectangle in Overhead>Test_Macros; to secure the estimate, first the macro gets a lock on the overhead workbook (Es.GetLockOnWorkbook) and after the execution, it releases the lock (Es.ReleaseLockOnWorkbook)
▪Sample_Import_Factors: pastes the selling factors, and if desired the rates, from an estimate to the current one based on their ID in Material and Workforce tabs (remove empty rows beforehand and close the source)
▪Sample_Program_CSharp: it is used by the 2rd dedicated button
▪Sample_Program_VisualBasic: same effect as the preceding.
The macro in Sample_with_WBS-Driven_Gantt deletes the Gantt Diagram and creates a new one in accordance with collapsed state of branches in Expanded WBS.
The macro in Sample_With_Multiple_Scenarios drives the Quantity columns.
Macros in the Sample_Sets_Database:
▪Check_Integrity_All_Sets: checks that all invoked articles exist in a known folder
▪Get_Data_From_Article_Databases: writes to/updates the description, family, manufacturer, user defined fields using the article references in the Sample_Article_DB.qdb (save the sample in a known folder, open the copy, insert a virtual article (How to Develop a Set), enter the database number and name, enter the desired article reference, finally apply the macro)
▪Insert_Some_Rows
▪Printout: exports the whole content to a Excel spreadsheet.
The two first macros run also with SQL Server databases.
To run a macro using a dedicated button or on an event, refer to Events Management. To run the macro example, click the 2rd button; this opens a dialog box.
Excel Macros
To create/edit a macro, click Automation>Macros>Macros>Open Excel macro; this opens a dialog box.
To create a macro, right-click and select New Macro.
To import a macro, right-click, select Load Macro and select the macro among the files with extension qdvxlmacro; this opens a dialog box.note
To edit a macro, right-click it and select Edit Macro; this opens a dialog box: in the lower part, specify the macro full path and the macro name in Excel (Alt F8); in the upper parts, specify which estimate components must be exported to Excel and their destination full path.
To test a macro, select it and click the Proceed button.
To run a macro using the Macro menu, click Open Macro Excel, select the macro and click the Run button.
To run a macro using a dedicated button or on an event, refer to Events Management. To run the macro example, click the 3rd button; in Excel, the macro name is TESTME; this exports the Condensed WBS to Excel and creates the file Overhead.xls in C:\Temp. To export other parts, including the planner into various formats, right click Edit Macro, check the corresponding boxes and select Browse.
Macros That Involve a Report
You can refer to the following hidden columns of the Excel workbook resulting of an Export with formulas:
To protect the source of a macro, you can deliver it as a function.
Delivering a macro as a function allows you to:
▪protect its source and propagate it regardless of a template estimate from which it was imported
▪have a button at an ribbon appropriate place and with a specific icon.
Procedure:
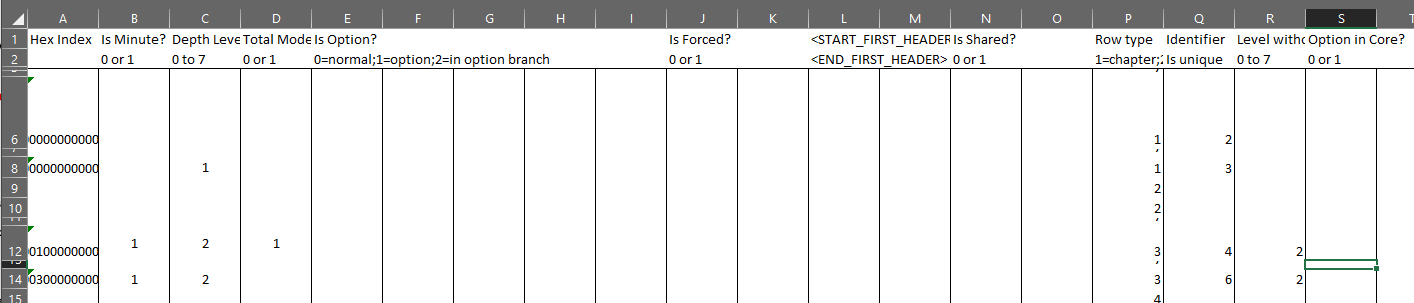
1.Create a QDV macro; a context (e.g. Minutes) can be defined with the Context object
2.Export the macro to a disk (extension is qdvmacro)
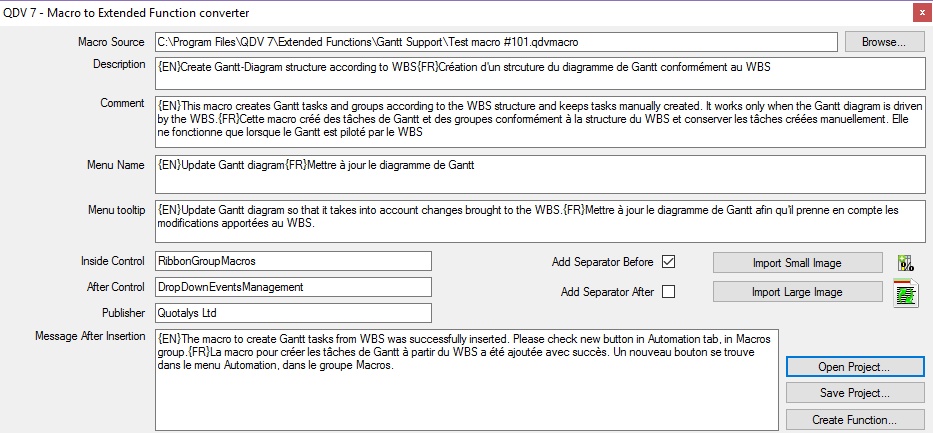
3.Run the application <installation folder>/Macro_2_Extended_Function.exe
4.Enter the button properties as exemplified
|
|
Label |
Button's position as per File>Tools> General>Customize Ribbon Optional
Language codes are optional |
Icon |
|
|
|
|
5.Click Save Project; this creates a file whose extension is qdmacroproject
6.Click Create Function; this creates a file whose extension is qqdvfunction.
To run the function:
1.To enable the function, check it in Macros>Additional Features; a button is available
2.Take the proper context if needed
3.Click the related button.