How to Develop the WBS |
  
|
How to Develop the WBS |
|
Tools: bar Home, group Edit>Insert

or context menu.
The context menu of a row is larger that the one of a node in the structural view:

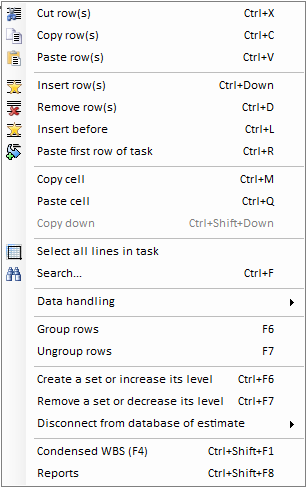
Applicability and correspondence between ribbon menu and context menu:
Group |
|
|
Context menu |
Condensed WBS |
Expanded WBS |
Minute |
|---|---|---|---|---|---|---|
Edit/Insert |
Cells and Rows |
Insert Rows Before |
Insert Rows |
|
x |
x |
Insert Rows After |
– |
|
|
x |
||
Tasks & Branches |
Insert Task |
New task |
x |
x |
|
|
Insert Sub task |
New sub task |
x |
x |
|
||
Edit/Delete |
Tasks & Branches |
Delete Task or Branch |
Remove task or branch |
x |
x |
– |
Delete |
Delete Rows |
Remove row(s) |
|
x |
x |
Tasks
To add a task, right-click a node or a row with a node, and select New task. This inserts a node below the selected node with a mark which is autofilled to increment the series. For example, A/b follows A/a and A/2 follows A/1. QDV7 creates indices such as A/b,1.
To add a sub-task, right-click a node or a row with a node, and select New sub-task. This inserts:
▪a node hierarchically under the selected node with a mark which is that of the parent, followed by .1
▪a sub-total row.
In both cases, QDV7 inserts an interpolated row above the new (sub)task.
To remove an element, right-click it and select Remove task or branch.
To remove the branches and chapters whose tasks have a null quantity, right-click it and select Remove branches and tasks when quantity=0.
NOTE To make the marks consistent after task insertions, right-click a node and select Renumber all tasks. Refer to How to Number the Structural View.
You can cut/copy-paste a node thru the structural view's context menu.
From another estimate: drag and drop a node of the source to a node of the destination. Select the relative level in the displayed message.
Rows
To insert a row above a row:
1.Select the row
2.Right-click this row and select Insert row or on the Home tab, in the Edit group, click Insert menu and then Insert Rows Before. The new row height is always 14.95 mm (0.6 in); to adjust the height, select Format>Row Height.
To remove row(s), right-click it (them) and select Remove row(s).
You can cut/copy-paste a row through the row's context menu.
Limit for rows count is 65,536.