How to Navigate the WBS |
  
|
How to Navigate the WBS |
|
Tools: bar Home, group Navigate, Tasks or Find or structural view context menu

Structural View (Outline)
To expand/collapse the view:
▪Altogether and for the whole structural view: right-click anywhere and select Home>Navigate>Tasks>Expand/Collapse All, or use the structural view context menu Expand/Collapse all branches
▪At a node level: click the +/– mark of the parent node; all the sub-branches and leaves are shown hidden.
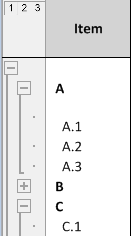
▪For the whole structure, but gradually, on a level basis: select the desired level of details in the numerical pad (1|2|3|4 up to 8, if needed). On the picture, 3 has been clicked so that nothing shows on level 4 and some rows are hidden.
NOTE The depth shown in the explorer equals the WBS Level native field of the Minutes plus 1.
In the Expanded WBS structural view, a symbol is affixed to each node. The generic symbols are as follows:
▪ ![]() represents a parent, whether it is expanded or collapsed
represents a parent, whether it is expanded or collapsed
▪![]() represents a terminal element, regardless of its level.
represents a terminal element, regardless of its level.
The shown symbols depend on the node status:
▪ parent: dark yellow when selected; o is overlaid when the node is optional (in addition, even unselected, the item and description show in dark green)
Open folder |
Collapsed folder |
|
Unselected |
|
|
Selected |
|
|
▪terminal element: red tab and blue/red lines when selected; o is overlaid when the element is optional (in addition, even unselected, the item and description show in dark green)
Regular |
Total |
Forced |
Total-Forced |
|
Unselected |
|
|
|
|
Selected |
|
|
|
|
NOTES
- After a change, it may be necessary to click View>Check and Repaint.
- When at least one branch of a chapter is optional, the chapter itself gets the o and dark green colors (it must be the direct parent).
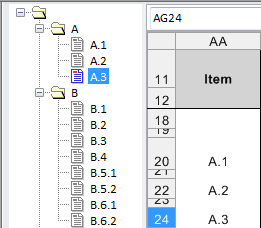
To match the node and a row, a mark on the right of a symbol repeats the value of the Item column it stands for. A row without an item is usually for comments and therefore has no node. When you click the symbol or the mark, a cell in the related row (depending on the latest selection) is selected (A.3 on the picture) and the first cell (24) turns blue (in Edit mode). Conversely, when you click a cell, the symbol and the mark are highlighted.
To show the node description on the right of the item mark, select View>Show/hide flags>Show Description in Tree.
If the Description column is dubbed (refer to Multilingualism), the column on the left is used. To enforce it, it may be necessary to click View>Check and Repaint, to right-click Renumber all tasks, close and reopen the estimate, OR recycle the Show toggler.
The marks can be used to navigate the structural view on level 1:
▪Click a symbol
▪Type in a letter or a digit, whether or not the level 1 is marked with a letter (A, B...) or a number
As a result, the focus skips to the first occurrence of the mark. A sound is heard if there is no match.
NOTE A mark can be affixed to the root, but it is erased when automatic numbering is applied.
You can find the occurrence of either a text or a number in the current sheet.
The search can be executed at the beginning of the string.
Proceed as follows:
1.Select Search>Find; this opens a dialog box
2.Enter the string and define the sought-after kind of string; you can narrow the search of a text by checking boxes Match the case and Whole word
3.Define the way to browse the matches from the current selection: By rows or By columns
4.Click Search; this closes the dialog box and puts the selection on the first match after the preceding selected cell
5.Press the key F3 to scroll through the successive matches.

NOTE The headers are out of the search scope.
To filter out the Expanded WBS rows or classify the rows otherwise, select View>Sorted WBS and filter/classify as in Excel (to changeover the header icon, you might uncheck the Banks box).
To easily fetch a cell, spot it and select it in the filtered window, and click Reach (alternative: double-click); as a result, it gets selected in the Expanded WBS (or in the Minutes view depending on the starting point) and the window is minimized. No multiple selection allowed.
To cancel all the filters and move the current selection back to the root, click Reset.
To make changes and still keep the Sorted WBS open, click Keep Open. Unlike changes in the Minutes and in the WBS, any change in the Nomenclatures, the Overhead or the Planner makes a Refresh warning blinks; to take these changes into account, click the warning button..
Bookmarks (cell mode)