Mapping the Customer's BoQ |
  
|
Mapping the Customer's BoQ |
|
![]() Save your selections often, both in the floating window and with File>Save.
Save your selections often, both in the floating window and with File>Save.
Mapping an Origin
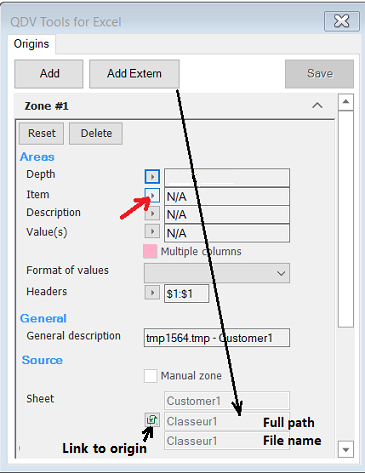
1.To display the zone details, click the drop-down
2.If there is no header row, insert it especially if you use the Final Column(s) option; select any cell in the header row and in the floating window, click the related arrow
3.In each Customer BoQ sheet, select the column range relating to Depth; in the floating window, click the arrow of the Depth field; this maps this field to the selected range
4.Select any cell in the Item, then Description column; in the floating window, click the arrow of the corresponding field; this maps the field to the corresponding range (on the same rows as the first mapped field)
5.Select the cell whose column will receive the numeric value; click the arrow of the Value field; for several columns (as many as numeric fields selected in step #2) (if the columns are not adjacent, press Ctrl; the Multiple columns box gets checked)
6.Select the Format of values in the drop-down list
A |
B |
C |
D |
E |
|
|
Item |
Description |
Quantity |
Total Selling price |
Selling price/unit |
|
|
1 |
Section #1 |
|
|
|
|
|
1.1 |
Task #1 |
|
|
|
|
|
1.2 |
Task #2 |
|
|
|
|
|
1.3 |
Task #3 |
|
|
|
|
|
2 |
Section #2 |
|
|
|
|
|
2.1 |
Task #4 |
|
|
|
|
|
|
|
|
|
|
|
|
|
|
|
|
|
|
|
|
|
|
|
|
|
|
|
|
|
Floating window → |
|
||
|
|
|
|
|
|
|
|
|
|
|
|
|
|
|
|
|
|
|
|
|
7.Edit if needed the General Description, e.g., telling the related trade
8.Save and repeat for other zones by clicking the ^ icon, then the drop-down icon
9.Click Customer>Refresh>Refresh the customer mapping; this populates the CUSTOMER_MAPPING sheet. The values are set to 0. With consolidation, an outline shows based on the Depth column. The BoQ values are also set to 0.
To delete .... |
|
a single mapping |
press the DEL key |
all the mappings in one zone |
click the Reset button |
a complete zone |
click the Delete button |
NOTES
- If the floating window does not show, select Pane
- In the CUSTOMER_MAPPING sheet, a row is added ahead (regardless of the Headers row) and the columns are shifted by 2 letters
- This procedure defines the named range RET_V1Zn (n is the zone number) which is 'CUSTOMER_MAPPING'!<Value range>
- By default, the outine buttons are below the detail rows; to put them above, select Data>Outline> ![]() launcher
launcher
- If #REF! shows (e.g., if you have clicked Source>Refresh), click Customer>Refresh, or repeat the whole procedure
- The General description feeds the Description of the Total row to the CUSTOMER_MAPPING sheet
- Alternative to clicking Cancel: pressing the Esc key.
Mapping Another Workbook
Refer to Adding an Extra Customer Source.