QDV Pricing Tool |
  
|
QDV Pricing Tool |
|
Use Case
The customer has published a blank BoQ in raw Excel format featuring an outline with the following columns:
A.Number of section, task or cost center (at standard format)
B.Description of section/task or name of a section/cost center, for example:
A |
B |
1 |
Section #1 |
1.1 |
Task #1 |
1.2 |
Task #2 |
1.3 |
Task #3 |
2 |
Section #2 |
2.1 |
Task #4 |
Others columns including Quantity are optional. Column headers can be added later.
A collection of sheets adds a higher-level outline, reflecting e.g., the various trades; their naming is optional.
You may have created a similar estimate with QDV7 and need to reconcile the QDV7 outline and the customer's one.
QDV7 Ultimate edition comes with an Excel Add-which aids pulling information from an existing QDV7 estimate and populating the customer's BoQ with acceptable values, which requires to distribute the QDV tasks values across the tasks, or across the higher levels if consolidation is desirable.
You may need to break down the customer tree (aka Customer WBS or Customer BoQ) into zones whenever there are several tabs in the workbook or a variation in the numbering of items in one tab. A zone is kind of Customer WBS.
If the tool does not manage to derive an item level from its item No., you must add a column to the Customer BoQ and map it with the Depth field in the floating pane. Depth is a field similar to the WBS Level of tasks that can be shown in the Minutes' view. The level 0 is the zone level.
Mapping: identification of BoQ columns with QDV7 fields.
Final column, a desired column of the final estimate, that derives from other regular columns. It is optional.
Data set: particular distribution of an estimate's values. This enables you to compare several strategies of distribution.
Principle
You must map the customer BoQ columns to indicate where the values (costs, selling price, ...) should come. Wherever there is no value, the row is skipped (filtering function whose effect is to flatten the structure).
The following schema shows a typical process with consolidation. You must distribute the total values taken from the WBS/OVH sections, across the tasks or centers of the customer's mapping: a value is split to three tasks/names (the colors are the default ones of the Settings menu):
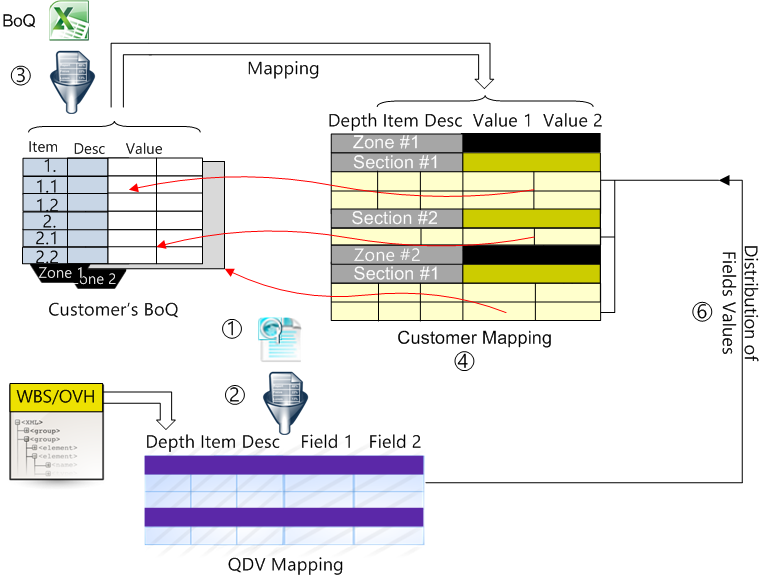
QDV Pricing Tool interprets the various sheets if any as the WBS/OVH first level (chapters), and the nodes as the WBS/OVH next levels.
Estimate |
Blank BoQ |
|
|
|
Filled BoQ |
||
↓ |
↓ |
|
|
↑ |
|||
1 |
2 (re-import) |
3 |
4 |
5 (option) |
6 |
||
|
|
|
|
|
|
||
New Excel file → |
LINK TO ESTIMATE |
IMPORT WBS/OVH TO EXCEL |
IMPORT BOQ TO EXCEL & MAP |
CUSTOMER MAPPING POPULATES |
INSERT FREE COLUMN |
DISTRIBUTE VALUES |
→ Populated Customer sheets |
Activating the Excel Add-In
Requisite: Excel 2013 or later.
1.In the QDV7 suite, open QDV Tools for Excel
2.Click Activate QDV Tools for Excel, then Close.
Opening and Setting the Excel Add-In
1.Open a new Excel file; in the QDV tab, select the Pricing app (hex icon on left hand):

2.Set Settings by defining in
▪Mapping: the conditional colors to annunciate cells still to map (Refer to Distributing the Values)
▪Source styles: the Light coefficient of the HSL model is used to set eight background colors for each level of Total rows (0.00 ... 0.40 in QDV_MAPPING
▪Target styles: the Light coefficient of the HSL model is used to set eight background colors for each level of Total rows (0.00 ... 0.40) in CUSTOMER_MAPPING and MAPPING#.
3.For the new settings to be applied, close and reopen the Excel file.
Linking To An Estimate
![]() Make sure the cursor is NOT in the formula bar; otherwise Excel is waiting for a formula: the state bar reads Edit, instead of Ready.
Make sure the cursor is NOT in the formula bar; otherwise Excel is waiting for a formula: the state bar reads Edit, instead of Ready.
To set a link to the estimate, click the Link icon in the QDV tab.
Select the estimate (herein called the source); the icon fades out. This adds the QDV_MAPPING and CUSTOMER_MAPPING sheets.
If you answer OK to the pop-up message prompting to choose columns, jump to the step #2 of the next section.
The window title turns to <Excel file name>[QDV-><estimate full path>]
Save the file.
To change the estimate, click Unlink and repeat the procedure.
NOTE If a default message pops up, close Excel, and repeat.
Importing the Source of Data
You need to make selections in the linked estimate:
1.Click Source>Import; when Excel is ready, it shows a window with two columns: 1. the WBS and the List for Overhead, 2. the list of numeric fields (or of 'any' type for free WBS fields)
2.Select one source in the first column and, in the second column, the WBS fields or OVH fields required by the customer (or needed for the calculation of a "final column"); these fields must have values in QDV7
3.Click OK: this shows in the QDV_MAPPING sheet the selected part.
![]() To help selecting fields in the lists ('Only show columns by default' box), tag the fields of interest beforehand:
To help selecting fields in the lists ('Only show columns by default' box), tag the fields of interest beforehand:
1.Select Estimate>Open and select the estimate
2.In the WBS Fields Manager, select the field row (native or free one)
3.Right click and select Show by default in the Excel tools; [SHOW_BY_DEFAULT_IN_TOOLS4XL] shows in the Comment column
4.Click OK.
CAVEAT The lists for OVH must NOT feature a free column.
NOTES
- It is not necessary that QDV7 be opened
- It is still possible to edit QDV_MAPPING. If you insert or delete rows in the estimate, the edits are lost when clicking Refresh, otherwise they are not and only the values are refreshed
- The Depth column takes its value from the 'WBS level' column or from the outline of the List for OVH
- The Options tasks feature a checkmark √ in all the Option columns on the right of each value columns
- To change the columns to show, just repeat the procedure
- The Calculated Selling Price includes potential contributions from free fields. (Refer to Description.)
Importing the Customer BoQ
1.Click Customer>Import; a file and sheets selector shows
2.Browse to the Excel blank BoQ and select the Excel sheets to import; the add-in creates as many sheets as selected and pastes the content
3.If it is absent, create a header row
4.If you have checked the 'Automatically create the zones' box, as many zones as selected sheets are created as origins; this autofills the General Description in the floating window used for mapping. Otherwise, select a sheet and, in the QDV for Excel tool floating window, click Add.
NOTE If you import another BoQ, it will be processed as an external file. Refer to Mapping an External Workbook.
![]() Do not use the default names (Sheet1, Sheet2, ...) for the BoQ sheets.
Do not use the default names (Sheet1, Sheet2, ...) for the BoQ sheets.
Updating the QDV Mapping & Expanding Steps #3 and 4 to Other Zones
If the estimate has been updated, click Source>Refresh.
You may want to add other BoQ sheets while keeping the previous mapping.
1.Repeat the step #3, where you check another sheet
2.Select a range
3.Select Define>Create a manual zone, and click OK
4.Select Define>Define Target origins (alternative: select Excel shortcuts>Pane); the floating window shows
5.Map the columns as usual.
Fixing the Customer Mapping Layout
OUTLINES
As the add-in figures out the depth based on the item values, you must check the depth values.
To promote a task/cost center, select it and click Decrease (the level).
To demote a task/cost center, select it and click Increase (the level).
EXCLUSION
To exclude a task or a chapter which no values are assigned to, select it and click Included. This is a toggler.
NOTES
- Refreshing nullifies these settings.
- On each of these operations, the present values are saved to a data set. Then when changing the worksheet, the tool restores the values as much as possible.
Miscellaneous
UNPROTECTING A SHEET
The state of a sheet is reflected by the potential action in the ribbon>Excel shortcuts: Protected if the toggler reads Unprotect, Unprotected if it reads Protect.
To unprotect a sheet, make sure that it is allowed as per Settings>General, and select Excel shortcuts>Unprotect. Unlike using the Review tab, no password is required.
Details