Articles Viewer Description |
  
|
Articles Viewer Description |
|
A database opens in connected mode in the article viewer.
This is a resizeable accordion window reflected in the bottom task bar by the icon ![]() .
.
To translate the headers, select Default Columns Titles. Refer to Multilingualism.
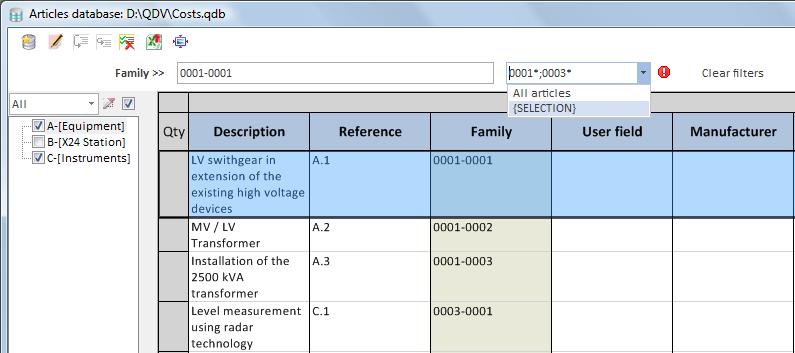
The Viewer features two flaps that contain from left to right:
- The tree-view, that can be hidden/shown by pressing the button << / >>; its width can be adjusted by dragging; the width is retained on the next opening; to create a tree-view (refer to How to Index a Table (Tree Structure)). To select several families, check the enabling box, then the boxes before the labels.
- The articles in the database whose display depends on the controls atop:
▪the button with a variable caption, used to search and filter the articles
▪the text area associated with the button (search)
▪the combo box (filtering)
▪the 'Clear filters' button, used to reset the list
▪the drop-down language list used to switch on/off the Description and Unit columns in extra languages (it shows if a special column has been defined; refer to Multilingualism).
To show the bottom pane, as in the Minutes view, select article(s), then View>Show-hide flags>Show Bottom View.
To zoom in/out the frame, hold the Ctrl key down and roll the mouse wheel.
To scroll the list, roll the mouse wheel.
At database opening, the rows are classified according to the numerical and alphabetical order of the latest master column.
The first button is assigned to the master column, which can also be identified by the tag >> appended to the header caption, and the shade. Any field with boldface - whether native or free - can be the master. To change the master column, use one of these methods:
Action |
Limit |
Mode |
Connected (Viewer) |
Click the variable caption button |
5 basic fields |
stepwise |
x |
Click a column header and press the keys ← or → |
x |
||
Click the column header |
fields with boldface |
direct |
x |
![]() To order the list according to a new master column, it may be necessary to click Clear filters.
To order the list according to a new master column, it may be necessary to click Clear filters.
1.Select the master column (criterion)
2.Enter the exact value to be searched for in the text area and press Enter; the list is limited to the exact matches
3.To hone the search, enter more chars
4.To return to the original display, click Clear filters.
MANUAL SEARCH
Alternative to steps 2 and 3: hold the mouse left-button down while the cursor is anywhere on the vertical scrolling bar; as a result, the first visible article’s master value shows on a gray background; drop the button when the value is correct.
SEARCH THROUGH INDEXES
To expand/collapse the tree defined in How to Index a Table (Tree Structure) on several levels, click the sign +/-.
To reach an article:
1.Click the code-description of the desired node in the tree-view; the code defined for this node shows in the placeholder (followed with *)
2.To reset the list, click Clear filters in the main pane.
To select several nodes, check the enabling box and check the boxes associated to the desired nodes; their codes show after one another in the placeholder (followed with *).
To reset the selection, click the icon in the middle (left pane).
To reset the list, click Clear filters in the main pane.
FILTERING
1.To select the criterion, select the master column or click through the fields (button indicator >>)
2.Enter the value of the filter and click Enter; the list is shortened to show only the matches, and the filter is retained
3.To delete the filter and return to the complete list, click Clear filters.
Separate two valid values by ;
A toggler rules out the need of wildcard char before and/or after the searched string (* substitutes for any char or digit, ? for any char):
|
Enter a wildcard char to substitute |
|
Wildcard is not indispensable: parts of word are tested against the string |
QUANTITY
The Quantity column (Qty) is special as it is the only one to be filled in connected mode. The quantities are entered on-the-fly before insertion into the minutes, then they disappear. Double-click the row, or right-click anywhere in it, or press the space bar or the Enter key; as a result the quantity (first column) turns to 1 and the row turns gray. If you repeat the operation, the quantity is reset.
To enter another figure, press Ctrl <digit> for each digit in the figure.
Hover an article with a quantity; then the caret turns from a star to a hand.
To deselect an article and reset all the quantities, click the 5th icon.
NOTE Double-clicking in the header is another way to set to 1 (if it equals 0) or to 0 (if it equals 1) the quantity of the first shown article.
To display only the grayed rows (i.e. having with a quantity), select the predefined filter called [SELECTION].
Viewer Toolbar
To replace the database by another one, click the ![]() icon ; the directory of the original database shows, with a contextual filtering.
icon ; the directory of the original database shows, with a contextual filtering.
![]() Do NOT use it for settings, as the settings are not retained when you click the Close button.
Do NOT use it for settings, as the settings are not retained when you click the Close button.
To switch to Edit mode, click the icon ![]() .
.
The third and fourth icons are dedicated to inserting an article into the Minutes:
▪the third one (F7) is for Insertion above
▪the fourth (F8) is for Insertion and ReplacementFor details on the whole procedure, refer to How to Insert an Article or a Set into a Section of Minutes.
To clear all the quantities, click the fifth icon in the toolbar (F9).
To export to Excel, click the icon ![]() .
.
This is subject to confidentiality restrictions. To define the scope of export, check one button:
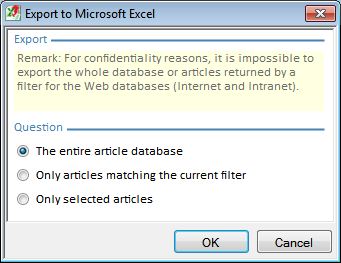
NOTE Export works alike in Edit mode (Database>Export>Excel). The filter is the sorting key (context menu).
To minimize the window, click the last icon in the toolbar (or the – icon in the window right corner). To revert to the full view, click again the last icon or twice the window title.