Interface General Description |
  
|
Interface General Description |
|
Open a set database (refer to How to Open a Set Database).
Viewer
The database opens in connected mode featured by an embedded menu, and the tag (Read only) appended to the window title.
The menu is similar to the one of the article database viewer in connected mode (refer to Articles Viewer Description). The extra icon ![]() is available to show the selected article in its database source. Refer to How to Retrieve the Sources.
is available to show the selected article in its database source. Refer to How to Retrieve the Sources.
The resizeable accordion window reflected in the bottom task bar by the icon ![]() features three flaps:
features three flaps:
- The tree-view, that can be hidden/shown by pressing the button << / >>; its width can be adjusted by dragging; the width is retained on the next opening; to create a tree-view (refer to How to Index a Table (Tree Structure)); the flap title reminds the field which the tree is based on
- The sets in the database whose display depends on the controls atop:
▪the button with a variable caption used to sort the sets according to one of the five basic field values (and the field Keep depth)
▪the text area to scroll the list to the first set that fulfills the criterion
▪the filtration combo box (type Enter to apply the filter)
▪the button Clear filters to wind up the list.
For details, refer to Articles Viewer Description.
- A workbook that includes the Articles table and, if configured in Edit mode, the Data table and extra free sheets (to change the names, select Home>Edit>Format>Rename Sheet)
Window:

To adjust the viewer, use either method:
▪Click the icons << or >>; the middle flap slides over the first or third respectively. Using the righ icon <<, the third flap slides over the middle one
▪Click the icon Reduced view; the third flap collapses and the middle flap shrinks and features only the Quantity and master columns.
To revert to the normal view, click the icons >> or <<, or the icon Extended view.
To change the width of a flap, drag and drop either vertical border of the middle flap.
![]() If the middle flap extends to the fullest on a side with the icon pointing outwards, drag and drop the corresponding border first.
If the middle flap extends to the fullest on a side with the icon pointing outwards, drag and drop the corresponding border first.
To zoom in/out the frame, hold the key Ctrl down and roll the mouse wheel.
The columns Description, Reference, Family, User field, Keep depth get their values from the recording (refer to How to Record a Set).
The column Quantity is filled on the fly before the insertion (to fill it, refer to Articles Viewer Description); to delete all the values, click the icon Cancel in the toolbar
INSERTION
The second and third icons in the toolbar are dedicated to inserting a set into the Minutes:
▪The third one (F7) is for Insertion
▪The fourth one (F8) is for Insertion and Replacement
For details on the whole procedure, refer to How to Insert an Article or a Set into a Section of Minutes.
To select another database, click the icon ![]() (refer to How to Open a Set Database).
(refer to How to Open a Set Database).
To change the mode, click the icon ![]() (refer to Database Modes).
(refer to Database Modes).
To retrieve the source of an article or of a nested set, select it and click the icon ![]() : the source viewer opens and the source takes the focus.
: the source viewer opens and the source takes the focus.
Editor
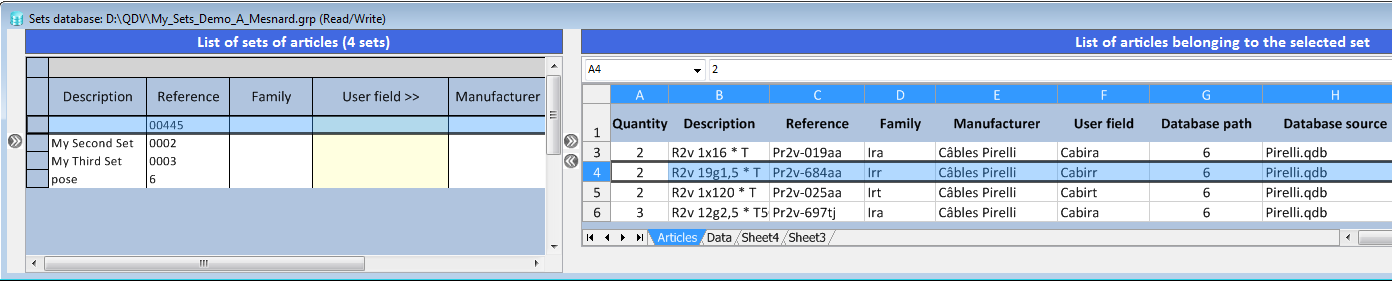
In Edit mode:
▪The label (Read/Write) is appended to the window title
▪The Database top menu substitutes for the embedded menu
▪The table of articles is topped by an Excel-like cell-selector combo box (J5 in the figure above) and an area for values and formulas
▪Extra tabs show (Sheet3 generally) if you have inserted new sheets thru the context menu
▪In the List of sets, you can change the values (including the column Keep depth)
▪To change the width of a column in the List of sets, select the column, right click and select Column width (as the Quantity column is invisible, just right click and select Quantity column width).