User Sheets |
  
|
User Sheets |
|
![]() Do not overuse the variety of cell formats and styles. The columns which do not influence the costs or prices can be inserted into the Reports of Overhead type.
Do not overuse the variety of cell formats and styles. The columns which do not influence the costs or prices can be inserted into the Reports of Overhead type.
These sheets are fit for up to 1,048,576 rows and 16,384 columns.
Visibility
Tool: Edit mode, bar Home>Edit>Format
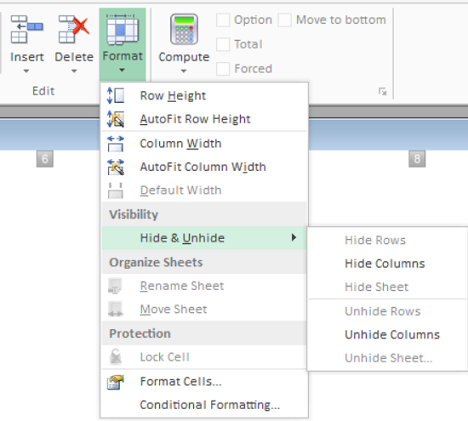
The rows without values are always hidden in normal mode. Other parts can be hidden on purpose.
To hide rows/columns in a user sheet:
1.Switch the sheet to Edit Mode
2.Select the rows/columns to hide
3.Click Home>Format>Hide & Unhide>Hide Rows/Columns.
To unhide hidden rows/columns in a user sheet:
1.Switch the sheet to Edit Mode
2.Select a range of rows/columns that encompasses the rows/columns to reveal (and includes at least one row/column visible if the fringe row/column are hidden)
3.Click Home>Format>Hide & Unhide>Unhide Rows/Columns. (Alternative: Autofit ...).
![]() To locate hidden rows/columns, search, in Edit mode, the "gaps" in the reference headers.
To locate hidden rows/columns, search, in Edit mode, the "gaps" in the reference headers.
To group rows/columns as in Creating a Structure:
1.Click Data>Excel>Edit under Excel
2.Under Excel, select a range of rows/columns
3.Click Data>Plan>Group
4.Save and import to QDV7.
Cells Dimensions
You can adjust the height and width manually or autofit them.
Editing
To insert a column:
1.Switch to Edit Mode
2.Select the column that will be after
3.Select Home>Edit>Insert>Insert Columns (alternative: context menu).
To delete a column, select it, and right click Delete Columns.
To copy from another sheet/paste:
1.Select Copy in the source context menu
2.To customize the pasting, switch to Edit Mode, and select Paste special in the target context menu (as in Excel, to paste a vertical range into a horizontal one, or vice versa, check Transpose).
To insert a formula, right click and select Editor of formulas. Proceed as with a BoQ. (Refer to Bill of Quantities (optional).)
To insert global variables, refer to Comsumption of Variables.
To insert a control, select the context menu Insert control. Refer to How to Ease Inputs with Controls.
To define/reset the print area, right click and select Set/Clear Print Area.
To show a number in words, enter a Num2Words formula:
Syntax for the general amount in words (wrap arguments in double quotes):
▪Num2Words(cell reference) returns the value in the current language; the separator between units and tenth is rendered with "point" in English, "virgule" in French, "komma" in Dutch ...
▪Num2Words(cell reference;language code) returns the value in the language code if it exists (the language is hard-coded, but SYS_Lang_UI is allowed as well, not SYS_Lang_Report)
▪Num2Words(cell reference;language code;Currency singular;Currency plural;Singular of hundredth;Plural of hundredth) adds currency units and hundredth of unit in words (the separator between units and tenth is rendered with "and" in English, "et" in French, ... and a period is automatically appended)
▪Num2Words(cell reference;language code;Currency singular;Currency plural;Singular of hundredth;Plural of hundredth;Gender of currency;Gender of hundredth) adds the gender of currency unit and hundredth when the language requests so (allowed values are M for Masculine, F for Feminine, N for Neutral)
▪Num2Words(cell reference;language code;Currency singular;Currency plural;Singular of hundredth;Plural of hundredth;Gender of currency;Gender of hundredth;Appended text) appends a supplemental text, e.g., " excluding VAT."
In addition, the cell containing this formula can be linked to a global variable. Refer to Comsumption of Variables.
Rows or columns can be dedicated to inserting comments.
Switch to Edit Mode, in which the whole sheet is visible.
To hide such an area, select it and click Home>Edit>Format>Visibility>Hide and Unhide>Hide Rows/Columns.
To reveal such an area, select it and click Home>Edit>Format>Visibility>Hide and Unhide>Unhide Rows/Columns.
Some areas can be hidden when the sheet is printed (menu File>Print) or exported to Excel.
To define a Print Area, click Data>Microsoft Excel>Edit under Microsoft Excel, and define there the Print Area.
To print only the headers, select Print_Titles in the left upper corner combo box.
To define a Visible Area, switch to Edit Mode and select the area and click Home>Edit>Format>Visibility>Set Visible Area.
To show only the Visible Area, hide the invisible area or select QDV_System_VisibleArea in the left upper corner combo box.