Planner Data |
  
|
Planner Data |
|
Use Cases
QDV7 can include the financial charges and incomes in the margin calculation.
This is implemented thru additional sheets (Cash Data and Cash-Flow Curve) in two cases:
▪a Planner is used (Planner data sheet)
▪a Time frame is used (Time frame sheet).
Planner Data
This sheet is used to define for the various Gantt tasks which components (Material, Workforce ...) must be taken into account and what are the payment terms.
To view the Planner Data and Cash Data sheets, select the proper item Gantt diagram in File>Options>Calculations; it may be necessary to refresh the screen. (Refer to General Interface.)
To populate the first column, create tasks in the Planner and refresh the sheet Planner Data.
To show the distribution of a total across the tasks in Gantt:
1.Switch to Edit Mode
2.Add a Total column (refer to Spread Sheets)
3.To include the totals of a column in the cash-flow calculations, enter any char in the row 'Take in Cash Flow Curve'; it turns into 'Cash'
4.To include the payment terms, enter the count of days before payment (usually 30, 45, 60, 90, 120) in the row 'Shift in payment' followed by EoM if the delay starts at the end of the month.
The declaration in the Take in Cash Flow Curve row defines to which section in the Cash Data sheet the values contribute:
▪blank: none
▪Cash: Liabilities and Outcome
▪List: Listed Resources, distribution of values, especially workforce values, across the months (at the end of the Cash Data sheet); this offers another standpoint on the times/costs.
- To handle several cash sheets, e.g., one for an On-shore task, one for an Off-shore task, insert 2 Cash Data sheets (up to 5), and assign to the tasks the following:
▪'Cash' will forward the amounts to all Cash Data sheets
▪'Cash1' will forward the amounts to Cash Data sheet #1, 'Cash2' will forward the amounts to Cash Data sheet #2, etc
▪'Cash1+3+5' for example will forward the amounts to Cash Data sheets #1, 3 and 5
▪'List' will forward the amounts to all Cash Data sheets
▪'List1' will forward the amounts to Cash Data sheet #1, 'List2' will forward the amounts to Cash Data sheet #2, etc
▪'List1+3+5' for example will forward the amounts to Cash Data sheets #1, 3 and 5.
- To undo step 3, right-click the column and select Delete selected fields
- If a particular Minute has no Task in Gantt selected, it is not taken into account; that is why the Material & Workforce totals are less or equal to those in the Overhead workbook.
![]() Add one column per set as all the amounts are consolidated in the Cash Data sheet.
Add one column per set as all the amounts are consolidated in the Cash Data sheet.
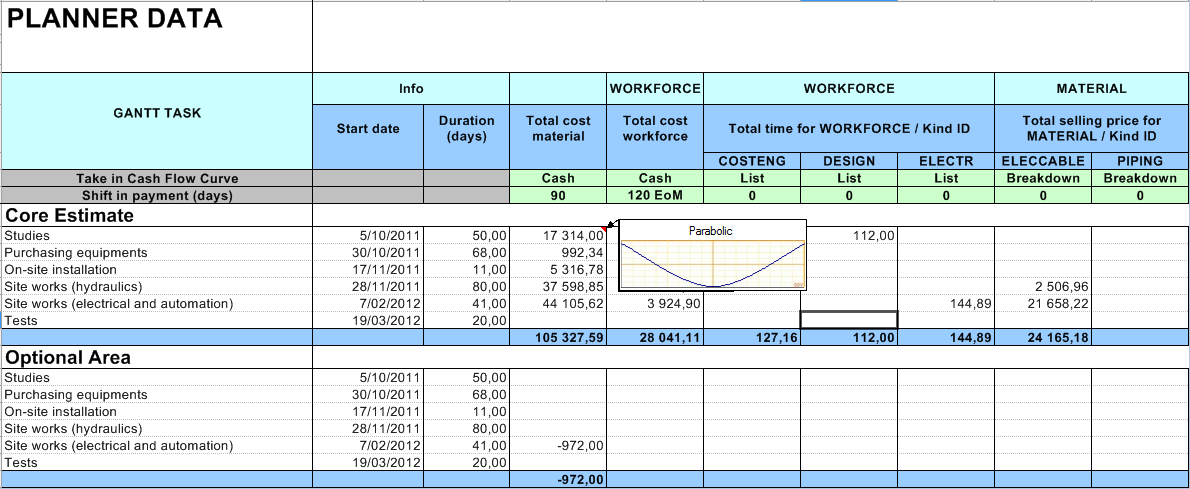
In fact a long task can require several installments, e.g., the launch of several orders or redoing a task due to failures. You can modulate the distribution of costs over time. The bathtub curve is common to account for replacement of failed hardware as the time goes. The material and workforce usually feature different distributions.
A curve can be assigned to a specific cell, a range of cells or to a whole column (default curve), but not to a group. The assignment is subject to conditions:
|
Administrator |
Ordinary bidder |
Row 'Take in Cash Flow Curve' |
Edit mode |
|
Core Estimate cell |
Edit mode or Permission: Planner Data editable |
Permission: Planner Data editable |
In the Planner data sheet:
1.Switch to Edit Mode
2.Make sure the relevant cost column has a value in the row 'Take in Cash Flow Curve'
3.Select a cell in the Core Estimate or the cell in the row 'Take in Cash Flow Curve'
4.Right-click and select Distribution curve (alternatives: click Overhead>Edition>Set Curve or the dialog box launcher ![]() on the right of Overhead>Edition>Set Distribution Curve); a dialog box shows:
on the right of Overhead>Edition>Set Distribution Curve); a dialog box shows:

5.Select a curve in the list (the default curves are of type System)
6.Click Select Curve; then the curve is assigned to the cost cell and a red triangle shows in the upper right corner (as for a note in Excel™)
7.To checkout the curve, hover the triangle or click the cell.
The steps 4 thru 6 can be replaced with one: select a curve in the list Overhead>Edition>Select Curve.
A column can feature a curve in the header and curves in rows as derogation.
If several curves are assigned in a row:
▪the higher level overrides the lower one, e.g., Total time for Workforce imposes its curve to a broken-down column
▪the Workforce total cost imposes its curve to the Workforce total time.
To create your own curve from scratch, refer to Custom Distribution Curves. Only the Owner curves can be deleted.
NOTES
- The default curve is Linear, which means the monthly expenses are in proportion to the count of days needed by the task in the month. On the contrary, the 'All at Startup' curve puts all the expenses on the starting month even though the task spans across two months
- If the start does not fall on the time frame, the shift is taken into account.